
各位游戏大佬大家好,今天小编为大家分享关于gg修改器授权root_gg修改器授权方法的内容,轻松修改游戏数据,赶快来一起来看看吧。
由于头条篇幅限制,分上下两部分呈现,你现在看的是上半部分。谢谢!!
技能目标:
· 了解什么是MySQL MHA
· 学会如何搭建MySQL MHA
· 学会MySQL MHA故障切换
7.1 案例分析
7.1.1 案例概述
目前MySQL已经成为市场主流数据库的一种,考虑到业务的重要性,MySQL数据库单点问题已成为企业网站架构中最大的隐患,随着技术的发展,MHA的出现就是解决MySQL单点的问题,另外随着企业数据量越来越庞大,数据库的压力又成为企业的另一个瓶颈,MySQL的多主多从的架构的出现可以减轻MySQL的压力。本章将主要介绍MHA的搭建和模拟MySQL故障自动切换的过程,介绍搭建MySQL多主多从的详细过程。
7.1.2 案例前置知识点
1.什么是MHA
MHA(Master High Availability)目前在MySQL高可用方面是一个相对成熟的解决方案,它由日本DeNA公司youshimaton(现就职于Facebook公司)开发,是一套优秀的作为MySQL高可用性环境下故障切换和主从提升的高可用软件。在MySQL故障切换过程中,MHA能做到在0~30秒之内自动完成数据库的故障切换操作,并且在进行故障切换的过程中,MHA能在最大程度上保证数据的一致性,以达到真正意义上的高可用。
2. MHA的组成
该软件由两部分组成:MHA Manager(管理节点)和MHA Node(数据节点)。MHA Manager可以单独部署在一台独立的机器上管理多个master-slave集群,也可以部署在一台slave节点上。MHA Node运行在每台MySQL服务器上,MHA Manager会定时探测集群中的master节点,当master出现故障时,它可以自动将最新数据的slave提升为新的master,然后将所有其他的slave重新指向新的master。整个故障转移过程对应用程序完全透明。
3. MHA优势
在MHA自动故障切换过程中,MHA试图从宕机的主服务器上保存二进制日志,最大程度的保证数据的不丢失,但这并不总是可行的。例如,如果主服务器硬件故障或无法通过ssh访问,MHA没法保存二进制日志,只进行故障转移而丢失了最新的数据。使用MySQL 5.5的半同步复制,可以大大降低数据丢失的风险。MHA可以与半同步复制结合起来。如果只有一个slave已经收到了最新的二进制日志,MHA可以将最新的二进制日志应用于其他所有的slave服务器上,因此可以保证所有节点的数据一致性。
4. MHA现状
目前MHA主要支持一主多从的架构,要搭建MHA要求一个复制集群中必须最少有三台数据库服务器,一主二从,即一台充当master,一台充当备用master,另外一台充当从库,因为至少需要三台服务器,出于机器成本的考虑,淘宝也在该基础上进行了改造,目前淘宝TMHA已经支持一主一从。有兴趣的可以试试。
7.1.3 案例环境
1. 本案例环境
本案例环境如表7-1所示。

表7-1 搭建MySQL MHA高可用案例环境
本实例中用到MYSQL版本请从官网进行下载,MHA的版本请从一些相关资源进行下载,因为google官网上面最新的还是2012年0.55版本,而且0.55版本只支持到CentOS6,这里操作系统是CentOS7版本,所以这里下载MHA版本是0.57版本。MHA架构如下图7.1所示:
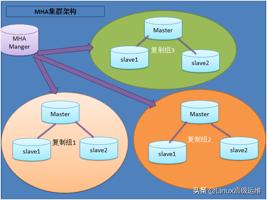
图7.1
上图中MHA可以同时监控并管理多个MySQL复制组,本案例只实验其中的一个复制组,具体拓扑图如下图7.2所示:
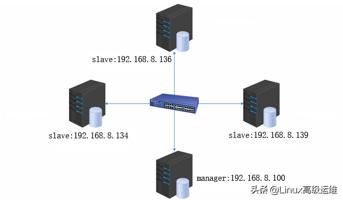
图7.2
2. 案例需求
本案例要求通过MHA监控MySQL数据库在故障时进行自动切换,不影响业务。
3. 案例实现思路
1) 安装MySQL数据库
2) 配置MySQL一主两从
3) 安装MHA软件
4) 配置无密码认证
5) 配置MySQL MHA高可用
6) 模拟master故障切换
7.2 案例实施
7.2.1 安装MySQL数据库
在三台mysql节点上分别安装数据库,MySQL版本请使用5.6.36,cmake版本请使用2.8.6。下面只在Mysql1上面做演示,安装过程如下:
1. 首先安装编译依赖的环境
[root@Mysql1 ~]# yum -y install ncurses-devel gcc-c++ perl-Module-Install
2. 安装gmake编译软件
[root@Mysql1 ~]# tar zxvf cmake-2.8.6.tar.gz
[root@Mysql1 ~]# cd cmake-2.8.6
[root@Mysql1 cmake-2.8.6]# ./configure
[root@Mysql1 cmake-2.8.6]# gmake && gmake install
3. 安装mysql数据库
[root@Mysql1 ~]# tar -zxvf mysql-5.6.36.tar.gz
[root@Mysql1 ~]# cd mysql-5.6.36
[root@Mysql1 mysql-5.6.36]# cmake -DCMAKE_INSTALL_PREFIX=/usr/local/mysql -DDEFAULT_CHARSET=utf8 -DDEFAULT_COLLATION=utf8_general_ci -DWITH_EXTRA_CHARSETS=all -DSYSCONFDIR=/etc
[root@Mysql1 mysql-5.6.36]# make && make install
[root@Mysql1 mysql-5.6.36]# cp support-files/my-f /etc/f
[root@Mysql1 mysql-5.6.36]# cp support-files/mysql.server /etc/rc.d/init.d/mysqld
[root@Mysql1 ~]# chmod +x /etc/rc.d/init.d/mysqld
[root@Mysql1 ~]# chkconfig –add mysqld
[root@Mysql1 ~]# echo “PATH=$PATH:/usr/local/mysql/bin” >> /etc/profile
[root@Mysql1 ~]# source /etc/profile
[root@Mysql1 ~]# groupadd mysql
[root@Mysql1 ~]# useradd -M -s /sbin/nologin mysql -g mysql
[root@Mysql1 ~]# chown -R mysql.mysql /usr/local/mysql
[root@Mysql1 ~]# mkdir -p /data/mysql
[root@Mysql1 ~]# /usr/local/mysql/scripts/mysql_install_db –basedir=/usr/local/mysql –datadir=/usr/local/mysql/data –user=mysql
4. 修改Master的主配置文件/etc/f文件,三台服务器的server-id不能一样,另外两台写2和3即可!写入内容如下:
[root@Mysql1 ~]# cat /etc/f
[mysqld]
server-id = 1
log_bin = master-bin
log-slave-updates = true
配置从服务器。
在/etc/f中修改或者增加下面内容。
[root@Mysql2 ~]# vim /etc/f
server-id = 2 //增加
relay-log = relay-log-bin //增加
relay-log-index = slave-relay-bin.index //增加
这里要注意server-id不能相同。
5. Mysql1、Mysql2、Mysql3分别做两个软链接,软链接是为HMA服务的
[root@Mysql1 ~]# ln -s /usr/local/mysql/bin/mysql /usr/sbin/
[root@Mysql1 ~]# ln -s /usr/local/mysql/bin/mysqlbinlog /usr/sbin/
6、Mysql1、Mysql2、Mysql3启动mysql
[root@Mysql1 ~]# /usr/local/mysql/bin/mysqld_safe –user=mysql &
7.2.2 配置mysql一主两从
1. mysql主从配置相对比较简单。需要注意的是授权。步骤如下:
在所有数据库节点上授权两个用户,一个是从库同步使用,另外一个是manager使用。
mysql> grant replication slave on *.* to ’myslave’@’192.168.8.%’ identified by ’123’;
mysql> grant all privileges on *.* to ’mha’@’192.168.8.%’ identified by ’manager’;
2. 下面三条授权按理论是不用添加的,但是做案例实验环境时候通过MHA检查MySQL主从有报错,报两个从库通过主机名连接不上主库,所以所有数据库加上下面的授权。
mysql> grant all privileges on *.* to ’mha’@’Mysql1’ identified by ’manager’;
mysql> grant all privileges on *.* to ’mha’@’Mysql2’ identified by ’manager’;
mysql> grant all privileges on *.* to ’mha’@’Mysql3’ identified by ’manager’;
3. 在Mysql1主机上查看二进制文件和同步点,如图7.3
图7.3
4. 接下来在Mysql2和Mysql3分别执行同步
mysql> change master to master_host=’192.168.8.134’,master_user=’myslave’,master_password=’123’,master_log_file=’mysql-bin.000001’,master_log_pos=675; 和上一章保持一致
mysql> start slave;
5. 查看IO和SQL线程都是yes代表同步是否正常
mysql> show slave statusG;
Slave_IO_Running: Yes
Slave_SQL_Running: Yes
必须设置两个从库为只读模式
mysql> set global read_only=1;
6. 在Mysql1主库插入两条数据,测试是否同步
mysql> create database test_db;
Query OK, 1 row affected (0.00 sec)
mysql> use test_db;
Database changed
mysql> create table test(id int);
Query OK, 0 rows affected (0.13 sec)
mysql> insert into test(id) values (1);
Query OK, 1 row affected (0.03 sec)
7. 在两个从库分别查询如下所示说明主从同步正常
mysql> select * from test_db.test;
+——+
| id |
+——+
| 1 |
+——+
1 row in set (0.00 sec)
7.2.3 安装MHA软件
1. 所有服务器上都安装MHA依赖的环境,首先安装epel源。
[root@MHA-manager ~]# yum install -y epel-release
[root@MHA-manager ~]# yum install -y perl-DBD-MySQL perl-Config-Tiny perl-Log-Dispatch perl-Parallel-ForkManager perl-ExtUtils-CBuilder perl-ExtUtils-MakeMaker perl-CPAN
2. MHA软件包对于每个操作系统版本不一样,这里CentOS7.3必须选择0.57版本,在所有服务器上必须先安装node组件,最后在MHA-manager节点上安装manager组件,因为manager依赖node组件,下面都是在Mysql1上操作演示安装node组件。
[root@Mysql1 ~]# tar zxvf mha4mysql-node-0.57.tar.gz
[root@Mysql1 ~]# cd mha4mysql-node-0.57
[root@Mysql1 mha4mysql-node-0.57]# perl Makefile.PL
[root@Mysql1 mha4mysql-node-0.57]# make
[root@Mysql1 mha4mysql-node-0.57]# make install
3. 在MHA-manager上安装manager组件
[root@MHA-manager ~]# tar zxvf mha4MHA-manager-0.57.tar.gz [root@MHA-manager ~]# cd mha4MHA-manager-0.57
[root@MHA-manager mha4MHA-manager-0.57]# perl Makefile.PL
*** Module::AutoInstall version 1.06
*** Checking for Perl dependencies…
[Core Features]
– DBI …loaded. (1.627)
– DBD::mysql …loaded. (4.023)
– Time::HiRes …loaded. (1.9725)
– Config::Tiny …loaded. (2.14)
– Log::Dispatch …loaded. (2.41)
– Parallel::ForkManager …loaded. (7.18)
– MHA::NodeConst …loaded. (0.57)
*** Module::AutoInstall configuration finished.
Checking if your kit plete…
Looks good
Writing Makefile for mha4mysql::manager
[root@MHA-manager mha4MHA-manager-0.57]# make
[root@MHA-manager mha4MHA-manager-0.57]# make install
manager安装后在/usr/local/bin下面会生成几个工具,主要包括以下几个:
masterha_check_ssh 检查MHA的SSH配置状况
masterha_check_repl 检查MySQL复制状况
masterha_manger 启动MHA
masterha_check_status 检测当前MHA运行状态
masterha_master_monitor 检测master是否宕机
masterha_master_switch 控制故障转移(自动或者手动)
masterha_conf_host 添加或删除配置的server信息
4. node安装后也会在/usr/local/bin下面会生成几个脚本(这些工具通常由MHA Manager的脚本触发,无需人为操作)主要如下:
save_binary_logs 保存和复制master的二进制日志
apply_diff_relay_logs 识别差异的中继日志事件并将其差异的事件应用于其他的slave
filter_mysqlbinlog 去除不必要的ROLLBACK事件(MHA已不再使用这个工具)
purge_relay_logs 清除中继日志(不会阻塞SQL线程)
7.2.4 配置无密码认证
1. 在manager上配置到所有节点的无密码认证
[root@MHA-manager ~]# ssh-keygen -t rsa //一路按回车键
[root@MHA-manager ~]# ssh-copy-id 192.168.8.134
[root@MHA-manager ~]# ssh-copy-id 192.168.8.136
[root@MHA-manager ~]# ssh-copy-id 192.168.8.139
2. 在Mysql1上配置到数据库节点的无密码认证
[root@Mysql1 ~]# ssh-keygen -t rsa
[root@Mysql1 ~]# ssh-copy-id 192.168.8.136
[root@Mysql1 ~]# ssh-copy-id 192.168.8.139
3. 在Mysql2上配置到数据库节点的无密码认证
[root@Mysql2 ~]# ssh-keygen -t rsa
[root@Mysql2 ~]# ssh-copy-id 192.168.8.134
[root@Mysql2 ~]# ssh-copy-id 192.168.8.139
4. 在Mysql3上配置到数据库节点的无密码认证
[root@Mysql3 ~]# ssh-keygen -t rsa
[root@Mysql3 ~]# ssh-copy-id 192.168.8.134
[root@Mysql3 ~]# ssh-copy-id 192.168.8.136
7.2.5 配置MHA
1. 在manager节点上复制相关脚本到/usr/local/bin目录
[root@MHA-manager ~]# cp -ra /root/mha4MHA-manager-0.57/samples/scripts /usr/local/bin
拷贝后会有四个执行文件
[root@atlas ~]# ll /usr/local/bin/scripts/
总用量 32
-rwxr-xr-x 1 mysql mysql 3648 5月 31 2015 master_ip_failover
-rwxr-xr-x 1 mysql mysql 9872 5月 25 09:07 master_ip_online_change
-rwxr-xr-x 1 mysql mysql 11867 5月 31 2015 power_manager
-rwxr-xr-x 1 mysql mysql 1360 5月 31 2015 send_report
master_ip_failover #自动切换时VIP管理的脚本
master_ip_online_change #在线切换时vip的管理
power_manager #故障发生后关闭主机的脚本
send_report #因故障切换后发送报警的脚本
2. 复制上述的自动切换时VIP管理的脚本到/usr/local/bin目录,这里使用脚本管理VIP,也是推荐的一种方式,生产环境不太建议使用keepalived。
[root@MHA-manager ~]# cp /usr/local/bin/scripts/master_ip_failover /usr/local/bin
3. 修改内容如下:
[root@MHA-manager ~]# cat /usr/local/bin/master_ip_failover
#!/usr/bin/env perl
# Copyright (C) 2011 DeNA Co.,Ltd.
#
# This program is free software; you can redistribute it and/or modify
# it under the terms of the GNU General Public License as published by
# the Free Software Foundation; either version 2 of the License, or
# (at your option) any later version.
#
# This program is distributed in the hope that it will be useful,
# but WITHOUT ANY WARRANTY; without even the implied warranty of
# MERCHANTABILITY or FITNESS FOR A PARTICULAR PURPOSE. See the
# GNU General Public License for more details.
#
# You should have received a copy of the GNU General Public License
# along with this program; if not, write to the Free Software
# Foundation, Inc.,
# 51 Franklin Street, Fifth Floor, Boston, MA 02110-1301 USA
## Note: This is a sample script and is plete. Modify the script based on your environment.
use strict;
use warnings FATAL =>’all’;
use Getopt::Long;
my (
$command, $ssh_user, $orig_master_host, $orig_master_ip,
$orig_master_port, $new_master_host, $new_master_ip, $new_master_port
);
my $vip = ’192.168.8.200/24’;
my $key = “1”;
my $ssh_start_vip = “/sbin/ifconfig ens33:$key $vip”;
my $ssh_stop_vip = “/sbin/ifconfig ens33:$key down”;
my $exit_code = 0;
GetOptions(
’command=s’ => $command,
’ssh_user=s’ => $ssh_user,
’orig_master_host=s’ => $orig_master_host,
’orig_master_ip=s’ => $orig_master_ip,
’orig_master_port=i’ => $orig_master_port,
’new_master_host=s’ => $new_master_host,
’new_master_ip=s’ => $new_master_ip,
’new_master_port=i’ => $new_master_port,
);
exit &main();
sub main {
#print ”
IN SCRIPT TEST====$ssh_stop_vip==$ssh_start_vip===
“;
if ( $command eq “stop” || $command eq “stopssh” ) {
# $orig_master_host, $orig_master_ip, $orig_master_port are passed.
# If you manage master ip address at global catalog database,
# invalidate orig_master_ip here.
my $exit_code = 1;
eval {
print ”
***************************************************************
“;
print “Disabling the VIP – $vip on old master: $orig_master_host
“;
print “***************************************************************
“;
&stop_vip();
$exit_code = 0;
};
if ($@) {
warn “Got Error: $@
“;
exit $exit_code;
}
exit $exit_code;
}
elsif ( $command eq “start” ) {
# all arguments are passed.
# If you manage master ip address at global catalog database,
# activate new_master_ip here.
# You can also grant write access (create user, set read_only=0, etc) here.
my $exit_code = 10;
eval {
print ”
***************************************************************
“;
print “Enabling the VIP – $vip on new master: $new_master_host
“;
print “***************************************************************
“;
&start_vip();
$exit_code = 0;
};
if ($@) {
warn $@;
exit $exit_code;
}
exit $exit_code;
}
elsif ( $command eq “status” ) {
print “Checking the Status of the script.. OK
“;
`ssh $ssh_user@$orig_master_host ” $ssh_start_vip “`;
exit 0;
}
else {
&usage();
exit 1;
}
}
# A simple system call that enable the VIP on the new master
sub start_vip() {
`ssh $ssh_user@$new_master_host ” $ssh_start_vip “`;
}
# A simple system call that disable the VIP on the old_master
sub stop_vip() {
`ssh $ssh_user@$orig_master_host ” $ssh_stop_vip “`;
}
sub usage {
“Usage: master_ip_failover ?command=start|stop|stopssh|status ?orig_master_host=host ?orig_master_ip=ip
?orig_master_port=port ?new_master_host=host ?new_master_ip=ip ?new_master_port=port
“;
}
4. 创建MHA软件目录并拷贝配置文件
[root@MHA-manager ~]# mkdir /etc/masterha
[root@MHA-manager ~]# cp /root/mha4MHA-manager-0.57/samples/conf/f /etc/masterha
[root@MHA-manager ~]# cat /etc/masterha/f
[server default]
manager_workdir=/var/log/masterha/app1
manager_log=/var/log/masterha/app1/manager.log
master_binlog_dir=/usr/local/mysql/data
master_ip_failover_script= /usr/local/bin/master_ip_failover
master_ip_online_change_script= /usr/local/bin/master_ip_online_change
password=manager
user=mha
ping_interval=1
remote_workdir=/tmp
repl_password=123
repl_user=myslave
secondary_check_script= /usr/local/bin/masterha_secondary_check -s 192.168.8.136 -s 192.168.8.139
shutdown_script=””
ssh_user=root
[server1]
hostname=192.168.8.134
port=3306
[server2]
hostname=192.168.8.136
port=3306
candidate_master=1
check_repl_delay=0
[server3]
hostname=192.168.8.139
port=3306
5. 测试ssh无密码认证,如果正常最后会输出successfully,如图1.6
[root@MHA-manager ~]# masterha_check_ssh -conf=/etc/masterha/f
Thu May 17 14:07:29 2018 – [warning] Global configuration file /etc/masterha_f not found. Skipping.
Thu May 17 14:07:29 2018 – [info] Reading application default configuration from /etc/masterha/f..
Thu May 17 14:07:29 2018 – [info] Reading server configuration from /etc/masterha/f..
Thu May 17 14:07:29 2018 – [info] Starting SSH connection tests..
Thu May 17 14:07:30 2018 – [debug]
Thu May 17 14:07:29 2018 – [debug] Connecting via SSH from root@192.168.8.134(192.168.8.134:22) to root@192.168.8.136(192.168.8.136:22)..
Thu May 17 14:07:30 2018 – [debug] ok.
Thu May 17 14:07:30 2018 – [debug] Connecting via SSH from root@192.168.8.134(192.168.8.134:22) to root@192.168.8.139(192.168.8.139:22)..
Thu May 17 14:07:30 2018 – [debug] ok.
Thu May 17 14:07:31 2018 – [debug]
Thu May 17 14:07:30 2018 – [debug] Connecting via SSH from root@192.168.8.136(192.168.8.136:22) to root@192.168.8.134(192.168.8.134:22)..
Thu May 17 14:07:30 2018 – [debug] ok.
Thu May 17 14:07:30 2018 – [debug] Connecting via SSH from root@192.168.8.136(192.168.8.136:22) to root@192.168.8.139(192.168.8.139:22)..
Thu May 17 14:07:30 2018 – [debug] ok.
Thu May 17 14:07:32 2018 – [debug]
Thu May 17 14:07:30 2018 – [debug] Connecting via SSH from root@192.168.8.139(192.168.8.139:22) to root@192.168.8.134(192.168.8.134:22)..
Thu May 17 14:07:31 2018 – [debug] ok.
Thu May 17 14:07:31 2018 – [debug] Connecting via SSH from root@192.168.8.139(192.168.8.139:22) to root@192.168.8.136(192.168.8.136:22)..
Thu May 17 14:07:31 2018 – [debug] ok.
Thu May 17 14:07:32 2018 – [info] All SSH connection tests passed successfully.
6. 测试mysq主从连接情况,最后出现MySQL Replication Health is OK字样说明正常。如下所示:
[root@MHA-manager ~]# masterha_check_repl -conf=/etc/masterha/f
Thu May 17 16:44:55 2018 – [warning] Global configuration file /etc/masterha_f not found. Skipping.
Thu May 17 16:44:55 2018 – [info] Reading application default configuration from /etc/masterha/f..
Thu May 17 16:44:55 2018 – [info] Reading server configuration from /etc/masterha/f..
Thu May 17 16:44:55 2018 – [info] MHA::MasterMonitor version 0.57.
Thu May 17 16:44:56 2018 – [info] GTID failover mode = 0
Thu May 17 16:44:56 2018 – [info] Dead Servers:
Thu May 17 16:44:56 2018 – [info] Alive Servers:
Thu May 17 16:44:56 2018 – [info] 192.168.8.134(192.168.8.134:3306)
Thu May 17 16:44:56 2018 – [info] 192.168.8.136(192.168.8.136:3306)
Thu May 17 16:44:56 2018 – [info] 192.168.8.139(192.168.8.139:3306)
Thu May 17 16:44:56 2018 – [info] Alive Slaves:
Thu May 17 16:44:56 2018 – [info] Checking replication filtering settings..
Thu May 17 16:44:56 2018 – [info] binlog_do_db= , binlog_ignore_db=
Thu May 17 16:44:56 2018 – [info] Replication filtering check ok.
……//省略部分
Cleaning up test file(s).. done.
Thu May 17 16:45:00 2018 – [info] Slaves settings check done.
Thu May 17 16:45:00 2018 – [info]
192.168.8.134(192.168.8.134:3306) (current master)
+–192.168.8.136(192.168.8.136:3306)
+–192.168.8.139(192.168.8.139:3306)
Thu May 17 16:45:00 2018 – [info] Checking replication health on 192.168.8.136..
Thu May 17 16:45:00 2018 – [info] ok.
Thu May 17 16:45:00 2018 – [info] Checking replication health on 192.168.8.139..
Thu May 17 16:45:00 2018 – [info] ok.
Thu May 17 16:45:00 2018 – [info] Checking master_ip_failover_script status:
Thu May 17 16:45:00 2018 – [info] /usr/local/bin/master_ip_failover –command=status –ssh_user=root –orig_master_host=192.168.8.134 –orig_master_ip=192.168.8.134 –orig_master_port=3306
Checking the Status of the script.. OK
Thu May 17 16:45:00 2018 – [info] OK.
Thu May 17 16:45:00 2018 – [warning] shutdown_script is not defined.
Thu May 17 16:45:00 2018 – [info] Got exit code 0 (Not master dead).
MySQL Replication Health is OK.
7. 启动MHA,下面是具体参数说明
[root@MHA-manager ~]# nohup masterha_manager –conf=/etc/masterha/f –remove_dead_master_conf –ignore_last_failover < /dev/null > /var/log/masterha/app1/manager.log 2>&1 &
–remove_dead_master_conf 该参数代表当发生主从切换后,老的主库的ip将会从配置文件中移除。 –manger_log 日志存放位置 –ignore_last_failover 在缺省情况下,如果MHA检测到连续发生宕机,且两次宕机间隔不足8小时的话,则不会进行Failover,之所以这样限制是为了避免ping-pong效应。该参数代表忽略上次MHA触发切换产生的文件,默认情况下,MHA发生切换后会在日志记目录,也就是上面设置的日志app1.plete文件,下次再次切换的时候如果发现该目录下存在该文件将不允许触发切换,除非在第一次切换后收到删除该文件,为了方便,这里设置为–ignore_last_failover
8. 查看MHA状态,可以看到当前的master是Mysql1节点
[root@MHA-manager ~]# masterha_check_status –conf=/etc/masterha/f
app1 (pid:7763) is running(0:PING_OK), master:192.168.8.134
9. 查看MHA日志,也以看到当前的master是192.168.8.134,如下图1.8所示:
[root@MHA-manager ~]# cat /var/log/masterha/app1/manager.log
Thu May 17 16:49:48 2018 – [warning] Global configuration file /etc/masterha_f not found. Skipping.
Thu May 17 16:49:48 2018 – [info] Reading application default configuration from /etc/masterha/f..
Thu May 17 16:49:48 2018 – [info] Reading server configuration from /etc/masterha/f..
Thu May 17 16:49:48 2018 – [info] MHA::MasterMonitor version 0.57.
Thu May 17 16:49:49 2018 – [info] GTID failover mode = 0
Thu May 17 16:49:49 2018 – [info] Dead Servers:
Thu May 17 16:49:49 2018 – [info] Alive Servers:
Thu May 17 16:49:49 2018 – [info] 192.168.8.134(192.168.8.134:3306)
Thu May 17 16:49:49 2018 – [info] 192.168.8.136(192.168.8.136:3306)
Thu May 17 16:49:49 2018 – [info] 192.168.8.139(192.168.8.139:3306)
……//省略部分
Testing mysqlbinlog output.. done.
Cleaning up test file(s).. done.
Thu May 17 16:49:54 2018 – [info] Slaves settings check done.
Thu May 17 16:49:54 2018 – [info]
192.168.8.134(192.168.8.134:3306) (current master)
+–192.168.8.136(192.168.8.136:3306)
+–192.168.8.139(192.168.8.139:3306)
Thu May 17 16:49:54 2018 – [info] Checking master_ip_failover_script status:
Thu May 17 16:49:54 2018 – [info] /usr/local/bin/master_ip_failover –command=status –ssh_user=root –orig_master_host=192.168.8.134 –orig_master_ip=192.168.8.134 –orig_master_port=3306
Checking the Status of the script.. OK
Thu May 17 16:49:54 2018 – [info] OK.
Thu May 17 16:49:54 2018 – [warning] shutdown_script is not defined.
Thu May 17 16:49:54 2018 – [info] Set master ping interval 1 seconds.
Thu May 17 16:49:54 2018 – [info] Set secondary check script: /usr/local/bin/masterha_secondary_check -s 192.168.8.136 -s 192.168.8.139
Thu May 17 16:49:54 2018 – [info] Starting ping health check on 192.168.8.134(192.168.8.134:3306)..
Thu May 17 16:49:54 2018 – [info] Ping(SELECT) succeeded, waiting until MySQL doesn’t respond..
10. 查看Mysql1的VIP地址192.168.8.200是否存在?,这个VIP地址不会因为manager节点停止MHA服务而消失
[root@Mysql1 ~]# ifconfig
ens33: flags=4163<UP,BROADCAST,RUNNING,MULTICAST> mtu 1500
inet 192.168.8.134 netmask 255.255.255.0 broadcast 192.168.8.255
inet6 fe80::20c:29ff:feeb:b2c5 prefixlen 64 scopeid 0x20<link>
ether 00:0c:29:eb:b2:c5 txqueuelen 1000 (Ethernet)
RX packets 32494 bytes 19929135 (19.0 MiB)
RX errors 0 dropped 0 overruns 0 frame 0
TX packets 20439 bytes 3094488 (2.9 MiB)
TX errors 0 dropped 0 overruns 0 carrier 0 collisions 0
ens33:1: flags=4163<UP,BROADCAST,RUNNING,MULTICAST> mtu 1500
inet 192.168.8.200 netmask 255.255.255.0 broadcast 192.168.8.255
ether 00:0c:29:eb:b2:c5 txqueuelen 1000 (Ethernet)
以上就是关于gg修改器授权root_gg修改器授权方法的全部内容,游戏大佬们学会了吗?
gg修改器应用宝root权限,下载gg修改器应用宝root权限软件,助力游戏体验 分类:免root版 6,432人在玩 现在的手机游戏越来越多,玩家们在游戏中追求更加高质量的游戏体验,但是有些游戏里的道具需要充值才能得到,这对于许多玩家来说是不可接受的。为此,现在市面上出现了很多的辅助工……
下载
免root修改器gg,免root修改器gg:一款强大的手机游戏辅助工具 分类:免root版 6,258人在玩 在现今的手机游戏市场中,越来越多的游戏需要进行root权限方可使用各种辅助工具,但是root操作需要技术和风险,许多玩家不敢尝试。因此,一些开发者研制了一些非root的辅助工具,其……
下载
root gg修改器,下载root gg修改器,畅享游戏乐趣 分类:免root版 6,873人在玩 Root gg修改器是一款非常实用的Android游戏辅助工具,它可以让你在游戏中快速获得更多的资源和道具。如果你是一位喜欢玩手机游戏的玩家,那么Root gg修改器绝对值得你一试。 无需Ro……
下载
gg修改器与root,软件推荐:GG修改器与Root 分类:免root版 6,795人在玩 在现如今的互联网时代,游戏已经成为不少人娱乐放松的重要方式。但是,许多游戏受到了很多限制,例如不能修改游戏中的一些属性或者是无法使用某些特殊功能。这时候,GG修改器与Root……
下载
王者荣耀开挂修改器,王者荣耀无限刷点卷器免费 分类:免root版 9,648人在玩 王者荣耀开挂修改器是一款可以无限刷点卷器免费帮打的软件,在游戏中免费代打同时技能强大不落下风是非常有必要的,能够刷取点卷更是不得了的操作,这在无数玩家眼里都是不可能完……
下载
gg修改器如何免root版_gg修改器免root版雪冷水制作 分类:免root版 7,985人在玩 各位游戏大佬大家好,今天小编为大家分享关于gg修改器如何免root版_gg修改器免root版雪冷水制作的内容,轻松修改游戏数据,赶快来一起来看看吧。 西游修真传加速辅助工具 光环助手1……
下载
gg修改器手机版免root版_gg修改器免root版中文版 分类:免root版 7,633人在玩 各位游戏大佬大家好,今天小编为大家分享关于gg修改器手机版免root版_gg修改器免root版中文版的内容,轻松修改游戏数据,赶快来一起来看看吧。 IT之家(www.):简约就是美好:vivo……
下载
gg修改器怎么root游戏,下载GG修改器,轻松root游戏 分类:免root版 6,951人在玩 GG修改器是一款非常方便的Android游戏辅助工具。它可以帮助你解锁手机的root权限,从而让你能够更加自由地修改和优化你的游戏体验。 简单易用 GG修改器具有极其简单易用的界面。无……
下载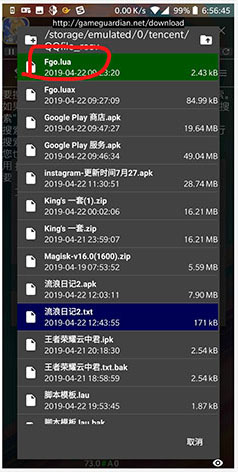
gg修改器root板,下载软件推荐:gg修改器root板 分类:免root版 5,579人在玩 对于喜欢在游戏中寻求创新的玩家来说,gg修改器root版是一个必备的工具。它能够帮助你修改游戏内部参数,提高你的游戏体验。下面我们来详细介绍一下这个软件。 什么是gg修改器root……
下载
gg修改器root超级命令,下载最新的GG修改器,获得Root超级命令 分类:免root版 5,802人在玩 GG修改器是一款非常受欢迎的游戏改变工具,在游戏中使用它可以轻松地获得Root超级命令。该软件支持大部分主流的Android手机和平板电脑,并且提供了简单易用的界面,让用户轻松上手……
下载