各位游戏大佬大家好,今天小编为大家分享关于无法授予gg修改器root_授权gg修改器的内容,轻松修改游戏数据,赶快来一起来看看吧。
|
角色 |
机器 |
备注 |
|
Obd |
xxx.xx.153.210 |
中控机、obclient |
|
Observer01 |
xxx.xx.153.211 |
Oceanbase zone1 |
|
Observer02 |
xxx.xx.153.212 |
Oceanbase zone2 |
|
Observer03 |
xxx.xx.153.213 |
Oceanbase zone3 |
|
Obproxy |
xxx.xx.153.211 |
Oceanbase 反向代理 |
服务器配置:
系统版本:CentOS Linux release 7.6.1810 (Core)-最小化安装
内存:32G
Cpu:4C
vim /etc/sysctl.conf

net.core.somaxconn = 2048

net.core.netdev_max_backlog = 10000

net.core.rmem_default = 16777216

net.core.wmem_default = 16777216

net.core.rmem_max = 16777216

net.core.wmem_max = 16777216

net.ipv4.ip_local_port_range = 3500 65535

net.ipv4.ip_forward = 0

net.ipv4.conf.default.rp_filter = 1

net.ipv4.conf.default.accept_source_route = 0

net.ipv4.tcp_syncookies = 0

net.ipv4.tcp_rmem = 4096 87380 16777216

net.ipv4.tcp_wmem = 4096 65536 16777216

net.ipv4.tcp_max_syn_backlog = 16384

net.ipv4.tcp_fin_timeout = 15

net.ipv4.tcp_max_syn_backlog = 16384

net.ipv4.tcp_tw_reuse = 1

net.ipv4.tcp_tw_recycle = 1

net.ipv4.tcp_slow_start_after_idle=0

vm.swappiness = 0

vm.min_free_kbytes = 2097152

vm.max_map_count=655360

fs.aio-max-nr=1048576
或采用如下脚本
cat > /etc/sysctl.d/98-obce.conf <<-’EOF’

net.core.somaxconn = 2048

net.core.netdev_max_backlog = 10000

net.core.rmem_default = 16777216

net.core.wmem_default = 16777216

net.core.rmem_max = 16777216

net.core.wmem_max = 16777216

net.ipv4.ip_local_port_range = 3500 65535

net.ipv4.ip_forward = 0

net.ipv4.conf.default.rp_filter = 1

net.ipv4.conf.default.accept_source_route = 0

net.ipv4.tcp_syncookies = 0

net.ipv4.tcp_rmem = 4096 87380 16777216

net.ipv4.tcp_wmem = 4096 65536 16777216

net.ipv4.tcp_max_syn_backlog = 16384

net.ipv4.tcp_fin_timeout = 15

net.ipv4.tcp_max_syn_backlog = 16384

net.ipv4.tcp_tw_reuse = 1

net.ipv4.tcp_tw_recycle = 1

net.ipv4.tcp_slow_start_after_idle=0

vm.swappiness = 0

vm.min_free_kbytes = 2097152

vm.max_map_count=655360

fs.aio-max-nr=1048576

EOF

sysctl --system
您可以通过配置 limits.conf 限制修改会话限制。 OceanBase 数据库的进程涉及的限制包括线程最大栈空间大小(Stack)、最大文件句柄数(Open Files)和 core 文件大小 (Core File Size)。
您可以使用以下两种方法修改资源限制:
更改配置文件说明。
将会话级别的最大栈空间大小设置为 unlimited,最大文件句柄数设置为 655350,Core 文件大小设置为 unlimited 。 修改 /etc/security/limits.conf 配置文件,如果已有设置值低于这个设置值
vi /etc/security/limits.conf

* soft nofile 655360

* hard nofile 655360

* soft nproc 655360

* hard nproc 655360

* soft core unlimited

* hard core unlimited

* soft stack unlimited

* hard stack unlimited
查看配置方法。退出当前会话,重新登录。执行以下命令,查看配置是否生效:
ulimit -a

cat > /etc/security/limits.d/98-obce.conf <<-’EOF’

# 最大栈空间大小设置为 unlimited,最大文件句柄数设置为 655350,Core 文件大小设置为 unlimited

* soft nofile 655360

* hard nofile 655360

* soft nproc 655360

* hard nproc 655360

* soft core unlimited

* hard core unlimited

* soft stack unlimited

* hard stack unlimited

EOF

# 检查确认

ulimit -a
systemctl status firewalld

如果是 inactive 那就不用管。如果是 active,那就永久关闭

systemctl disable firewalld

systemctl stop firewalld

systemctl status firewalld
修改 SELinux 配置文件中的 SELINUX 选项。 注意:必须使用注释中的三个值之一。如果写错了,机器重启后操作系统会报错起不来,那时候就只能进入单用户模式修改了。
vi /etc/selinux/config
# This file controls the state of SELinux on the system.

# SELINUX= can take one of these three values:

# enforcing - SELinux security policy is enforced.

# permissive - SELinux prints warnings instead of enforcing.

# disabled - No SELinux policy is loaded.

SELINUX=disabled

配置文件修改后只会重启主机后生效,还需要使用下面命令立即生效。

setenforce 0

采用如下

setenforce 0

getenforce

sed -i ’s/=enforcing/=disabled/g’ /etc/selinux/config

grep ’^SELINUX=’ /etc/selinux/config
Observer之间《100ms
这里采用 YUM 安装方法。您也可以下载相应的 RPM 包安装。
yum -y install chrony
chrony 服务守护进程名是 chronyd,chronyc 是用来监控 chronyd 性能和配置参数的命令行工具。 chrony 的主配置文件: /etc/chrony.conf 。配置方法如下:
chrony 服务守护进程名是 chronyd,chronyc 是用来监控 chronyd 性能和配置参数的命令行工具。 chrony 的主配置文件: /etc/chrony.conf 。配置方法如下:
vi /etc/chrony.conf
# server 后面跟时间同步服务器
# 使用pool.ntp.org 项目中的公共服务器。按 server 配置,理论上您想添加多少时间服务器都可以。
# 或者使用 阿里云的 ntp 服务器
# Please consider joining the pool (http://www.pool.ntp.org/join.html).
server ntp.cloud. minpoll 4 maxpoll 10 iburst
server ntp. minpoll 4 maxpoll 10 iburst
server ntp1. minpoll 4 maxpoll 10 iburst
server ntp1.cloud. minpoll 4 maxpoll 10 iburst
server ntp10.cloud. minpoll 4 maxpoll 10 iburst
# 如果是测试环境,没有时间同步服务器,那就选取一台配置为时间同步服务器。
# 如果选中的是本机,则取消下面 server 注释
#server 127.127.1.0
# 根据实际时间计算出服务器增减时间的比率,然后记录到一个文件中,在系统重启后为系统做出最佳时间补偿调整。
driftfile /var/lib/chrony/drift
# chronyd 根据需求减慢或加速时间调整,
# 在某些情况下系统时钟可能漂移过快,导致时间调整用时过长。
# 该指令强制 chronyd 调整时期,大于某个阀值时步进调整系统时钟。
# 只有在因 chronyd 启动时间超过指定的限制时(可使用负值来禁用限制)没有更多时钟更新时才生效。
makestep 1.0 3
# 将启用一个内核模式,在该模式中,系统时间每11分钟会拷贝到实时时钟(RTC)。
rtcsync
# Enable hardware timestamping on all interfaces that support it.
# 通过使用hwtimestamp指令启用硬件时间戳
#hwtimestamp eth0
#hwtimestamp eth1
#hwtimestamp *
# Increase the minimum number of selectable sources required to adjust
# the system clock.
#minsources 2
# 指定一台主机、子网,或者网络以允许或拒绝NTP连接到扮演时钟服务器的机器
#allow 192.168.0.0/16
#deny 192.168/16
# 即使没有同步到时间源,也要服务时间
local stratum 10
# 指定包含NTP验证密钥的文件。
#keyfile /etc/chrony.keys
# 指定日志文件的目录。
logdir /var/log/chrony
# Select which information is logged.
#log measurements statistics tracking
最简单的配置文件如下:
server 127.127.1.0
allow 172.20.0.0/16
local stratum 10
使用 chrony 时间服务是为了保证 OceanBase 集群各个节点时间尽可能保证同步,下面这些命令供参考。具体使用请查看 chrony 官方使用说明:Chronyc Frequently Asked Questions
查看时间同步活动
chronyc activity
查看时间服务器
chronyc sources
查看同步状态
chronyc sources -v
校准时间服务器:
chronyc tracking
使用 clockdiff 命令可以检查本机跟目标机器的时间同步误差,以这个结果为准。
[root@obd etc]# cat /etc/chrony.conf

server 127.127.1.0

allow xxx.xx.153.0/24

local stratum 10

logdir /var/log/chrony

driftfile /var/lib/chrony/drift

客户端配置:vi /etc/chrony.conf

server xxx.xx.153.210 iburst
[root@observer01 etc]# clockdiff xxx.xx.153.210

.

host=xxx.xx.153.210 rtt=750(187)ms/0ms delta=0ms/0ms Thu Jan 27 12:24:17 2022

delta = 目标主机减当前主机时间 ,时间单位是毫秒

[root@observer01 etc]# chronyc sources -v

210 Number of sources = 1

.-- Source mode ’^’ = server, ’=’ = peer, ’#’ = local clock.

/ .- Source state ’*’ = current synced, ’+’ = combined , ’-’ = bined,

| / ’?’ = unreachable, ’x’ = time may be in error, ’~’ = time too variable.

|| .- xxxx [ yyyy ] +/- zzzz

|| Reachability register (octal) -. | xxxx = adjusted offset,

|| Log2(Polling interval) --. | | yyyy = measured offset,

||  | | zzzz = estimated error.

|| | |

MS Name/IP address Stratum Poll Reach LastRx Last sample

===============================================================================

^* xxx.xx.153.210 10 6 177 28 -33us[ -41us] +/- 205us
[root@observer01 etc]#
timedatectl set-timezone Asia/Shanghai

chronyc -a makestep

输出:

[root@obce00 ~]# chronyc -a makestep

200 OK
前面分析过,建议安装部署在普通用户下,后面都以用户 admin 为例。
注意:给用户 admin 赋 sudo 权限不是必须的,只是为了某些时候方便。您可以结合企业安全规范决定是否执行。
下面是创建用户 admin 并授予 sudo 权限的方法,供参考。
# 新增普通用户 admin
useradd admin
# 改用户密码
passwd admin
# 或下面命令指定密码,密码修改为自己的。
echo ’admin:adminPWD123’ | chpasswd
在 CentOS 上面给 admin 用户 增加 sodu 权限有两个方法:
# 如果sudo 不存在,就安装 sudo
yum install -y sudo
# 方法一:admin 加到用户组 wheel 里。
[root@obce00 ~]# usermod admin -G wheel

[root@obce00 ~]# id admin

uid=1000(admin) gid=1000(admin) groups=1000(admin),10(wheel)
# 方法二:admin 添加到 /etc/sudoers 文件中
[root@obce00 ~]# cat /etc/sudoers |grep wheel

## Allows people in group wheel to run mands

%wheel ALL=(ALL) ALL

# %wheel ALL=(ALL) NOPASSWD: ALL

vim /etc/sudoers

## Allow root to run mands anywhere

admin ALL=(ALL) ALL
验证方法,切换到 admin 用户下,执行命令:sudo date 。输入密码后能返回结果。
如果您是完全手动部署 OceanBase 集群,则登录到相应节点上安装相关软件包,并启动 observer 或 obproxy 进程,则不需要配置 SSH 免密登录。 如果您是使用自动化技术部署 OceanBase 集群,则需要一台中控机。所有的命令通过中控机向 OceanBase 集群节点发出。则需要配置中控机的 OBD 运行的用户到 OceanBase 集群节点的 OBSERVER 安装的用户的 SSH 免密登录。本文示例是中控机的用户 admin 到 OBSERVER 节点的用户 admin 的免密登录。
这个配置 SSH 免密登录方法有很多,这里选择将中控机的 RSA 或 DSA 公钥复制到目标节点的 SSH 配置文件中。
ssh-keygen -t rsa
输出:
[admin@obce00 ~]$ ssh-keygen -t rsa

Generating public/private rsa key pair.

Enter file in which to save the key (/home/admin/.ssh/id_rsa):

Created directory ’/home/admin/.ssh’.

Enter passphrase (empty for no passphrase):

Enter same passphrase again:

Your identification has been saved in /home/admin/.ssh/id_rsa.

Your public key has been saved in /home/admin/.ssh/id_rsa.pub.

The key fingerprint is:

SHA256:7yCIks5NT8j7L1XIq+gRL3qm04cvHTSQmlaNr4gdHqc admin@obce00

The key’s randomart image is:

+---[RSA 3072]----+

| + |

| = . |

| + o . . |

| +o .+ o . |

|oo.*o . S |

|.oEo+o o . |

|o o*=o= . . |

|oo+B*= . o |

| =*+=+o. . |

+----[SHA256]-----+

[admin@obce00 ~]$

[admin@obce00 ~]$ ls -al .ssh/

total 8

drwx------ 2 admin admin 38 Sep 11 14:43 .

drwx------ 4 admin admin 115 Sep 11 14:43 ..

-rw------- 1 admin admin 2602 Sep 11 14:43 id_rsa

-rw-r--r-- 1 admin admin 569 Sep 11 14:43 id_rsa.pub

上面命令会在用户的 HOME 目录生成文件夹 .ssh 。注意,不要改变文件夹以及里面文件的访问权限。
复制 RSA 或 DSA 公钥到目标节点,推荐使用命令 ssh-copy-id 。
[root@obd ~]# su - admin

[admin@obd ~]$ ssh-keygen -t rsa

Generating public/private rsa key pair.

Enter file in which to save the key (/home/admin/.ssh/id_rsa):

Created directory ’/home/admin/.ssh’.

Enter passphrase (empty for no passphrase):

Enter same passphrase again:

Your identification has been saved in /home/admin/.ssh/id_rsa.

Your public key has been saved in /home/admin/.ssh/id_rsa.pub.

The key fingerprint is:

SHA256:xAGBh9Ec6W6zLpa91qt02BBMMnYVsFw/p57IM/Hztj8 admin@obd

The key’s randomart image is:

+---[RSA 2048]----+

| =*BB=. |

| .oB=+ o |

| o= o o . |

| .o + |

| .. S . |

| += = . |

| +o+B = |

| +.+..o o. E |

| . ++o.. .oo.. |

+----[SHA256]-----+

[admin@obd ~]$ ssh-copy-id obd

[admin@obd ~]$ ssh-copy-id observer01

[admin@obd ~]$ ssh-copy-id observer02

[admin@obd ~]$ ssh-copy-id observer03
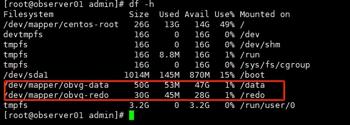
OceanBase 读写磁盘主要是三类文件:
这三个文件尽可能的分散在不同的磁盘上存储。如果物理上只有一块盘,则可以使用 fdisk 或 lvm 划分为多个逻辑盘。 下面针对机器提供的裸盘(/dev/vdb) 演示如何分盘。
fdisk 或者 parted,以及 LVM 技术都是磁盘划分组合的手段。这里就不详细描述方法。 不管是哪种办法,优先考虑事务日志文件的大小,生产环境建议是可用内存大小的 3-4 倍。剩余的大小再留给数据文件。如果是学习环境,总的盘大小本身就很小,可以不遵守这个规则,日志文件大小比内存大 1-2 倍也可以。
注意: OBProxy 独立部署的服务器就不用做这个文件系统划分了。OBProxy 只有运行日志目录。
fdisk -l

pvcreate /dev/sdb

vgcreate obvg /dev/sdb

lvcreate -n redo -L 30G obvg

mkfs.ext4 /dev/mapper/obvg-redo

lvcreate -n data -L 50G obvg

mkfs.ext4 /dev/mapper/obvg-data

mkdir /data

mkdir /redo

echo "/dev/mapper/obvg-redo /redo ext4 defaults 0 0">>/etc/fstab

echo "/dev/mapper/obvg-data /data ext4 defaults 0 0">>/etc/fstab

mount –a查看目录大小

chown -R admin.admin /data /redo

https://open./munity/oceanbase-database/V3.1.1/deploy-the-distributed-oceanbase-cluster
https://www./munity
[root@observer01 admin]# rpm -ivh oceanbase-ce-3.1.2-10000392021123010.el7.x86_64.rpm oceanbase-ce-libs-3.1.2-10000392021123010.el7.x86_64.rpm

warning: oceanbase-ce-3.1.2-10000392021123010.el7.x86_64.rpm: Header V4 RSA/SHA1 Signature, key ID e9b4a7aa: NOKEY

Preparing... ################################# [100%]

Updating / installing...

1:oceanbase-ce-libs-3.1.2-100003920################################# [ 50%]

2:oceanbase-ce-3.1.2-10000392021123################################# [100%]

软件自动安装到/home/admin/oceanbase下

修改oceanbase目录的属组为admin.admin,否则创建目录失败
[root@observer03 admin]# chown admin.admin oceanbase
创建目录并建立软连接。
[admin@observer01 ~]$ mkdir -p ~/oceanbase/store/obdemo /data/obdemo/{sstable,etc3} /redo/obdemo/{clog,ilog,slog,etc2}

[admin@observer01 ~]$ for f in {clog,ilog,slog,etc2}; do ln -s /redo/obdemo/$f ~/oceanbase/store/obdemo/$f ; done

[admin@observer01 ~]$ for f in {sstable,etc3}; do ln -s /data/obdemo/$f ~/oceanbase/store/obdemo/$f; done

[admin@observer01 ~]$

su - admin

echo ’export LD_LIBRARY_PATH=$LD_LIBRARY_PATH:~/oceanbase/lib’ >> ~/.bash_profile

. ~/.bash_profile
第一台启动
cd ~/oceanbase && bin/observer -i ens192 -p 2881 -P 2882 -z zone1 -d ~/oceanbase/store/obdemo -r ’xxx.xx.153.211:2882:2881;xxx.xx.153.212:2882:2881;xxx.xx.153.213:2882:2881’ -c 2 -n obcls01 -o "memory_limit=8G,cache_wash_threshold=1G,__min_full_resource_pool_memory=268435456,system_memory=3G,memory_chunk_cache_size=128M,cpu_count=16,net_thread_count=4,datafile_size=20G,stack_size=1536K,config_additional_dir=/data/obdemo/etc3;/redo/obdemo/etc2" -d ~/oceanbase/store/obdemo
启动参数介绍
[admin@observer01 oceanbase]$ bin/observer --help

bin/observer --help

observer [OPTIONS]

-h,--help print this help

-V,--version print the information of version

-z,--zone ZONE zone

-p,--mysql_port PORT mysql port

-P,--rpc_port PORT rpc port

-N,--nodaemon don’t run in daemon

-n,--appname APPNAME application name

-c,--cluster_id ID cluster id

-d,--data_dir DIR OceanBase data directory

-i,--devname DEV net dev interface

-o,--optstr OPTSTR extra options string

-r,--rs_list RS_LIST root service list

-l,--log_level LOG_LEVEL server log level

-6,--ipv6 USE_IPV6 server use ipv6 address

-m,--mode MODE server mode

-f,--scn flashback_scn
第二台启动
cd ~/oceanbase && bin/observer -i ens192 -p 2881 -P 2882 -z zone2 -d ~/oceanbase/store/obdemo -r ’xxx.xx.153.211:2882:2881;xxx.xx.153.212:2882:2881;xxx.xx.153.213:2882:2881’ -c 2 -n obcls01 -o "memory_limit=8G,cache_wash_threshold=1G,__min_full_resource_pool_memory=268435456,system_memory=3G,memory_chunk_cache_size=128M,cpu_count=16,net_thread_count=4,datafile_size=20G,stack_size=1536K,config_additional_dir=/data/obdemo/etc3;/redo/obdemo/etc2" -d ~/oceanbase/store/obdemo
第三台启动
cd ~/oceanbase && bin/observer -i ens192 -p 2881 -P 2882 -z zone3 -d ~/oceanbase/store/obdemo -r ’xxx.xx.153.211:2882:2881;xxx.xx.153.212:2882:2881;xxx.xx.153.213:2882:2881’ -c 2 -n obcls01 -o "memory_limit=8G,cache_wash_threshold=1G,__min_full_resource_pool_memory=268435456,system_memory=3G,memory_chunk_cache_size=128M,cpu_count=16,net_thread_count=4,datafile_size=20G,stack_size=1536K,config_additional_dir=/data/obdemo/etc3;/redo/obdemo/etc2" -d ~/oceanbase/store/obdemo
如果三个节点机型都一致,那么启动参数里只有一个参数不一样,就是 -z 指定该节点是哪个 zone 。三个 zone 的三个节点初始化为一个三副本集群。后面 -o 参数不是必须的。这里主要是测试机器内存不足,所以需要指定一些影响内存的参数。如果您机器内存足够(如大于64G),则可以不需要 -o 参数部分。
[admin@obd ~]$ IPS=”xxx.xx.153.213 xxx.xx.153.211 xxx.xx.153.212″
[admin@obd ~]$ for ob in $IPS;do echo $ob; ssh $ob “netstat -ntlp”; done

当 OceanBase 集群三个节点都正常启动,并且监听正常时,连接到任一节点(通过 2881 端口直连),进行自举(bootstrap 集群初始化)操作。 初始密码是空
[admin@obd ~]$ mysql -h xxx.xx.153.211 -u root -P 2881 -p -c -A

Enter password:

e to the MariaDB monitor. Commands end with ; or g.

Your MySQL connection id is 3221225472

Server version: 5.7.25 OceanBase 3.1.2 (r10000392021123010-d4ace121deae5b81d8f0b40afbc4c02705b7fc1d) (Built Dec 30 2021 02:47:29)

Copyright (c) 2000, 2018, Oracle, MariaDB Corporation Ab and others.

Type ’help;’ or ’h’ for help. Type ’c’ to clear the current input statement.

MySQL [(none)]> set session ob_query_timeout=1000000000;

Query OK, 0 rows affected (0.00 sec)

MySQL [(none)]> alter system bootstrap ZONE ’zone1’ SERVER ’xxx.xx.153.211:2882’, ZONE ’zone2’ SERVER ’xxx.xx.153.212:2882’, ZONE ’zone3’ SERVER ’xxx.xx.153.213:2882’ ;

Query OK, 0 rows affected (25.80 sec)

查看集群资源

设置root密码
MySQL [oceanbase]> alter user root identified by ’root’;

Query OK, 0 rows affected (0.02 sec)
登陆集群
[admin@obd ~]$ mysql -h xxx.xx.153.211 -u root -P 2881 -p -c -A

Enter password:

e to the MariaDB monitor. Commands end with ; or g.

Your MySQL connection id is 3221495366

Server version: 5.7.25 OceanBase 3.1.2 (r10000392021123010-d4ace121deae5b81d8f0b40afbc4c02705b7fc1d) (Built Dec 30 2021 02:47:29)

Copyright (c) 2000, 2018, Oracle, MariaDB Corporation Ab and others.

Type ’help;’ or ’h’ for help. Type ’c’ to clear the current input statement.

MySQL [(none)]> use oceanbase;

MySQL [oceanbase]> grant select on oceanbase.* to proxyro identified by ’proxyro’ ; 创建proxy用户
[admin@observer01 ~]$ sudo rpm -ivh obproxy-3.1.0-1.el7.x86_64.rpm
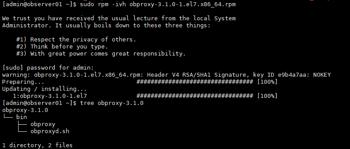
[admin@observer01 ~]$ cd ~/obproxy-3.1.0/ && bin/obproxy -r "xxx.xx.153.211:2881;xxx.xx.153.212:2881;xxx.xx.153.213:2881" -p 2883 -o "enable_strict_kernel_release=false,enable_cluster_checkout=false,enable_metadb_used=false" -c obcls01

bin/obproxy -r xxx.xx.153.211:2881;xxx.xx.153.212:2881;xxx.xx.153.213:2881 -p 2883 -o enable_strict_kernel_release=false,enable_cluster_checkout=false,enable_metadb_used=false -c obcls01

rs list: xxx.xx.153.211:2881;xxx.xx.153.212:2881;xxx.xx.153.213:2881

listen port: 2883

optstr: enable_strict_kernel_release=false,enable_cluster_checkout=false,enable_metadb_used=false

cluster_name: obcls01
查看状态

登录用户名:root@proxysys, 端口:2883 ,初始密码:空。
[admin@obd ~]$ mysql -h xxx.xx.153.211 -u root@proxysys -P 2883 -p

Enter password:

e to the MariaDB monitor. Commands end with ; or g.

Your MySQL connection id is 1

Server version: 5.6.25

Copyright (c) 2000, 2018, Oracle, MariaDB Corporation Ab and others.

Type ’help;’ or ’h’ for help. Type ’c’ to clear the current input statement.

MySQL [(none)]> show proxyconfig like ’%sys_password%’;

2 rows in set (0.00 sec)
修改 OBPROXY 用户密码是通过修改参数的方式,命令是:alter proxyconfig set 。
alter proxyconfig set obproxy_sys_password = ’proxysys’;
同时还需要修改 OBPROXY 连接 OceanBase 集群用户 proxyro 的密码。这样 OBPROXY 才能跟 OceanBase 集群正常连接。这个密码就是前面 OceanBase 集群初始化后创建的用户 proxyro 的密码。
alter proxyconfig set observer_sys_password = ’ proxyro’ ; 密码为集群初始化后创建的proxyro用户的密码
退出,通过 OBPROXY 连接 OceanBase 集群看看, 如果能查看所有会话,则说明 OBPROXY 部署成功。

[admin@obd ~]$ mysql -h xxx.xx.153.211 -u root@sys#obcls01 -P2883 -p -c -A oceanbase
Enter password:

登陆确认:

登陆报错处理:
admin@obd ~]$ mysql -h xxx.xx.153.211 -u root@sys#obcls01 -P 2883 -p -c -A oceanbase
Enter password:
ERROR 2013 (HY000): Lost connection to MySQL server at ’reading authorization packet’, system error: 0
重新初始化proxyro的密码
登陆集群
[admin@obd ~]$ mysql -h xxx.xx.153.211 -u root@sys -P2881 -p -c -A oceanbase

Enter password:

e to the MariaDB monitor. Commands end with ; or g.

Your MySQL connection id is 3221504890

Server version: 5.7.25 OceanBase 3.1.2 (r10000392021123010-d4ace121deae5b81d8f0b40afbc4c02705b7fc1d) (Built Dec 30 2021 02:47:29)

Copyright (c) 2000, 2018, Oracle, MariaDB Corporation Ab and others.

Type ’help;’ or ’h’ for help. Type ’c’ to clear the current input statement.

MySQL [oceanbase]> alter user proxyro identified by ’proxyro’;

Query OK, 0 rows affected (0.01 sec)

登陆proxy

[admin@obd ~]$ mysql -h xxx.xx.153.211 -u root@proxysys -P 2883 -p

Enter password:

e to the MariaDB monitor. Commands end with ; or g.

Your MySQL connection id is 19

Server version: 5.6.25

Copyright (c) 2000, 2018, Oracle, MariaDB Corporation Ab and others.

Type ’help;’ or ’h’ for help. Type ’c’ to clear the current input statement.

MySQL [(none)]> alter proxyconfig set observer_sys_password =’proxyro’;

Query OK, 0 rows affected (0.00 sec)
以上就是关于无法授予gg修改器root_授权gg修改器的全部内容,游戏大佬们学会了吗?

gg修改器要没root吗,下载一个无需Root的GG修改器?没问题! 分类:免root版 4,709人在玩 现如今,越来越多的手机用户开始使用GG修改器来改变一些游戏的内部数据。然而,很多这种修改器都需要进行Root操作才能正常运行,而这对于许多用户来说是一个非常大的问题。但现在,……
下载
gg修改器修改root,优秀的软件推荐:GG修改器 – 让Root轻松又安全 分类:免root版 3,860人在玩 如果你是一个Android手机用户,那么你可能已经听过“Root”这个词。Root是指获取手机管理员权限,从而可以更改系统设置、卸载预装软件等等。虽然Root可以带来很多便利和自由,但也存……
下载
gg修改器root平行空间,下载GG修改器root平行空间,拥有更多权限! 分类:免root版 4,352人在玩 如果你是一位手机玩家,那么你一定知道一些应用需要root权限才能使用。在过去,想要获取root权限非常困难,而且还存在着很大的风险。但是现在,有了GG修改器root平行空间,你可以轻……
下载
gg修改器免rootxs,下载GG修改器免rootxs,畅享游戏乐趣 分类:免root版 2,612人在玩 玩手游的你是否曾经遇到过以下情况:想要获得更多金币或者道具,但是需要充钱或刷任务,耗费时间和精力;又或者游戏难度太高,无法通过某一关卡,让你倍感挫败?现在,有了GG修改器……
下载
gg修改器去root_gg修改器去广告免root 分类:免root版 6,549人在玩 各位游戏大佬大家好,今天小编为大家分享关于gg修改器去root_gg修改器去广告免root的内容,轻松修改游戏数据,赶快来一起来看看吧。 所需工具:unc0ver越狱工具(后台回复1097获取……
下载
gg修改器怎么下root,软件推荐:GG修改器助您轻松获取ROOT权限! 分类:免root版 2,606人在玩 如果您是一名Android手机用户,想要获取更高的权限操作您的手机,那么您必须要获得ROOT权限。然而,对于大多数普通用户来说,如何获取ROOT权限并不是一件容易的事情。但是,在这里……
下载
gg修改器root使用视频 分类:免root版 5,597人在玩 各位游戏大佬大家好,今天小编为大家分享关于gg修改器root使用视频的内容,轻松修改游戏数据,赶快来一起来看看吧。 了解Ansible: Ansible是一个配置管理和应用部署工具,基于Pyth……
下载
gg修改器无root启动,软件下载:GG修改器无root启动 分类:免root版 4,363人在玩 如果您是一位玩家,您可能会发现某些游戏需要root权限才能使用修改器。但是,通过使用GG修改器无root启动软件,您可以避免这个问题并获得更多的控制。 轻松修改游戏设置 GG修改器……
下载
gg修改器怎么还要root,GG修改器无需Root,下载地址 分类:免root版 4,218人在玩 GG修改器是一款非常实用的游戏辅助工具。有了这个神器,玩家能够轻松地修改游戏数据,获得更多优势。GG修改器的最大特点就是不需要Root权限,这意味着你无需为了使用它而冒着失去保……
下载
怎样让gg修改器免root,下载一个无需ROOT的GG修改器,让你轻松修改游戏 分类:免root版 4,140人在玩 现在越来越多的人喜欢玩手游,但是有些游戏的难度确实很大,如果没有一款好用的修改器,那么就很难享受到游戏带来的快乐了。而GG修改器无疑是目前市面上最为知名和好用的修改器之一……
下载