各位游戏大佬大家好,今天小编为大家分享关于微信h5游戏gg修改器_微信h5小游戏修改器的内容,轻松修改游戏数据,赶快来一起来看看吧。
然后选择免费额度
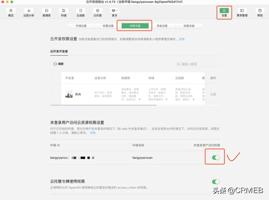
找到权限设置,把这里的「未登录用户访问权限」点开

这里我们先只需要建个名为openMiniapp的云函数放在这里就行,它的代码后面再写。

添加一下这部分配置,注意这里的名称要和云函数的名称一致:

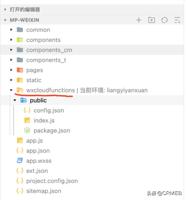
如果是原生小程序,当配置完云开发+云函数之后,小程序项目目录应该就多出一个云函数的目录(可能叫cloudbase,但是因为我这里是用的uniapp,这个目录是自定义的,我设置为wxcloudfunctions):
附:
uniapp配置云函数教程1
uniapp配置云函数教程2
云函数的代码:
package.json:
{

  "name": "GENERAL",

  "version": "1.0.0",

  "description": "",

  "main": "index.js",

  "scripts": {

    "test": "echo "Error: no test specified" && exit 1"

  },

  "author": "",

  "license": "ISC",

  "dependencies": {

    "wx-server-sdk": "~2.3.2"

  }

}

复制代码
index.js:
const cloud = require(’wx-server-sdk’)

cloud.init()
exports.main = async (event, context) => {
const { path = ’’, queryData = {}, } = event // 我从H5那边传进来的参数,可以从event里获取到
// 获取queryStr
let queryStrArr = []
for (let key in queryData) {
const str = `${key}=${queryData[key]}` // name=tom
queryStrArr.push(str)
}
const queryStr = queryStrArr.join(’&’)
console.log(’path’, path)
console.log(’queryStr’, queryStr)
return cloud.openapi.urlscheme.generate({
jumpWxa: {
path: path ? (’/’ + path) : ’’, // 打开小程序时访问路径,为空则会进入主页
query: queryStr, // 可以使用 event 传入的数据制作特定参数,无需求则为空
},
isExpire: true, //是否到期失效,如果为true需要填写到期时间,默认false
expire_time: Math.round(new Date().getTime() / 1000) + 3600
//我们设置为当前时间3600秒后,也就是1小时后失效
//无需求可以去掉这两个参数(isExpire,expire_time)
})
}
复制代码
右键,选择创建并部署。
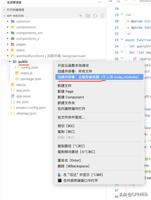
这样云函数的部署就完成了。
我的想法是写一个通用组件<JumpApp/>,不包含任何样式,内容通过<slot/>传进来,这样后面不管什么样的跳转都可以使用它了。
我可以这样:
<!-- 商品 -->

<view v-for="item in goodsList ?? []" :key="item.id" class="item_wrap">

  <JumpApp

    :ghid="jumpAppGhCode"

    :appid="jumpAppAppid"

    :envid="jumpAppEnvid"

    :ready="doctorInfo?.doctorCode"

    :path="`pages/product/details/details`"

    :queryData="{

      dCode: doctorInfo?.developerCode ?? ’’,

      skuCode: item.chnlGoodsId,

    }"

  >

    <view class="service_package_item">

      <image class="service_package_item_icon" :src="item.goodsImg?.split(’,’)[0] ?? ’’"></image>

      <view class="service_package_item_content">

        <view class="service_package_item_content_title_wrap">

          <view class="service_package_item_content_title">{{ item.goodsName }}</view>

          <view class="service_package_item_content_price">{{ item.goodsFeeStr }}元</view>

        </view>

        <view class="service_package_item_content_desc">{{ item.goodsDesc }}</view>

      </view>

    </view>

  </JumpApp>

</view>

复制代码
也可以这样:
<view class="buy_btn_box">

    <customButton v-if="drugListInfo?.disabled == 1" name="清单已失效,请重新联系医生" :disabled="true" />

    <!-- 跳转小程序 -->

    <JumpApp

      v-else

      :ghid="jumpAppGhCode"

      :appid="jumpAppAppid"

      :envid="jumpAppEnvid"

      :ready="jumpInfo.path"

      :path="jumpInfo.path"

      :queryData="jumpInfo.queryData"

    >

      <customButton type="primary" name="立即购买 送药上门" />

    </JumpApp>

  </view>

复制代码
|
props |
类型 |
默认值 |
说明 |
|
path |
string |
跳转的小程序路径 |
|
|
queryData |
object |
{} |
携带的参数 |
|
ready |
any |
只有当ready为true的时候,才会去执行最后一步 调用云函数,用于依赖一些异步数据的情况 |
|
|
callFunctionName |
string |
’openMiniapp’ |
调用的云函数的名称 |
|
ghid |
string |
小程序的原始id (gh开头的那个) |
|
|
appid |
string |
小程序的appid |
|
|
envid |
string |
云开发的云环境id |
附:
云环境id的位置:

  methods: {

    ...

    // 先配置

    async preConfig() {

      const self = this

      if (isWeixin()) {

        // 这里先忽略,这是 微信内H5 配置wxjssdk的部分

        return await configWx([], [’wx-open-launch-weapp’])

      } else {

        // 微信外

        if (!window.tcb) {

          window.tcb = new window.cloud.Cloud({

            identityless: true,

            resourceAppid: self.appid,

            resourceEnv: self.envid,

          })

        }

        return await window.tcb.init()

      }

    },

  ...

  }

复制代码
所以这里增加了个window.jumpAppState的变量用来判断当前页面是否正在初始化和是否初始化完成,用window.location.hash作为key,用来区分不同的页面。
  async mounted() {

    console.log(’jumpApp mounted’)

    if (!window.jumpAppState) window.jumpAppState = {}
// console.log(window.jumpAppState[`isReady_${window.location.hash}`])
// console.log(window.jumpAppState[`isGettingReady_${window.location.hash}`])
// 先配置
if (!window.jumpAppState[`isReady_${window.location.hash}`] && !window.jumpAppState[`isGettingReady_${window.location.hash}`]) {
console.log(’进入配置’)
window.jumpAppState[`isGettingReady_${window.location.hash}`] = true
await this.preConfig()
window.jumpAppState[`isGettingReady_${window.location.hash}`] = false
window.jumpAppState[`isReady_${window.location.hash}`]
}
// 先配置 end
console.log(’配置完毕’)
this.isPreConfigFinish = true
},
复制代码
methods: {

    ...

    // 微信外

    async initOutWeixin() {

      const self = this

      let res

      try {

        res = await window.tcb.callFunction({

          name: self.callFunctionName, // 提供UrlScheme服务的云函数名称

          data: {

            path: self.path,

            queryData: self.queryData,

          },

        })

      } catch (e) {

        console.log(’云函数失败了’, e)

      }

      console.log(’云函数结果’, res)

      this.minihref = res?.result?.openlink ?? ’’

      this.isInitWechatFinish = true

    },

    // 微信外跳转小程序 click

    handleOutWeixinClick() {

      if (!isWeixin() && this.minihref && this.isInitWechatFinish) {

        window.location.href = this.minihref

      }

    },

    ...

}

复制代码
最终拿到的这个minihref就是类似这种的地址:”weixin://dl/business/?ticket=slejlsdjlf”,我们直接调用window.location.href = this.minihref 就能触发跳转小程序了。
<template>

  <view class="p_1646876870010">

    <div class="open_app_div" @click="handleOutWeixinClick" v-html="openWeappBtnHtml"></div>

    <slot></slot>

  </view>

</template>

<script>

import { ref, onMounted } from ’vue’

import { configWx } from ’@/services/wx’

import { jumpAppGhCode } from ’@/utils/consts’

import { isWeixin } from ’@/utils/utils_h5’
// 因为一个页面可能有多个 JumpApp组件,用window 保存是否配置成功的状态,并且用当前页面的hash值区分 window.location.hash
// window.jumpAppState = {
// [`isGettingReady_${window.location.hash}`]: false,
// [`isReady_${window.location.hash}`]: false,
// }
/**
* 顺序: (几个变量)
* 1、preConfig
* 2、外部的ready 可以了
*
* 注:1、2 完成之后 isCanInitWechat 变为true ,开始init微信小程序的跳转
*
* 3、isInitWechatFinish 最终成功了
*/
export default {
data() {
return {
isPreConfigFinish: false, // preConfig是否完成
isInitWechatFinish: false, // 最终成功了
// 微信内
openWeappBtnHtml: ’’,
// 微信外
minihref: ’’,
}
},
props: {
// path 不需要带 ’/’
path: {
type: String,
},
queryData: {
type: Object,
default: () => ({}),
},
ready: {}, // 其它的外部的数据是否准备好 ready 为true的时候 才 添加wx-open-launch-weapp 或者 触发云函数
// 调用的云函数名称
callFunctionName: {
type: String,
default: ’openMiniapp’,
},
/**
* 微信内
*/
ghid: {
type: String,
},
/**
* 微信外
*/
appid: {
type: String,
},
// 云环境id
envid: {
type: String,
},
},
computed: {
isCanInitWechat() {
return this.isPreConfigFinish && this.ready
},
},
watch: {
isCanInitWechat(v) {
if (v) {
setTimeout(() => {
if (isWeixin()) {
this.initInWeixin()
} else {
this.initOutWeixin()
}
}, 0)
}
},
},
async mounted() {
console.log(’jumpApp mounted’)
if (!window.jumpAppState) window.jumpAppState = {}
// console.log(window.jumpAppState[`isReady_${window.location.hash}`])
// console.log(window.jumpAppState[`isGettingReady_${window.location.hash}`])
// 先配置
if (!window.jumpAppState[`isReady_${window.location.hash}`] && !window.jumpAppState[`isGettingReady_${window.location.hash}`]) {
console.log(’进入配置’)
window.jumpAppState[`isGettingReady_${window.location.hash}`] = true
await this.preConfig()
window.jumpAppState[`isGettingReady_${window.location.hash}`] = false
window.jumpAppState[`isReady_${window.location.hash}`]
}
// 先配置 end
console.log(’配置完毕’)
this.isPreConfigFinish = true
},
methods: {
// 先配置
async preConfig() {
const self = this
if (isWeixin()) {
return await configWx([], [’wx-open-launch-weapp’])
} else {
if (!window.tcb) {
window.tcb = new window.cloud.Cloud({
identityless: true,
resourceAppid: self.appid,
resourceEnv: self.envid,
})
}
return await window.tcb.init()
}
},
// 微信内
async initInWeixin() {
console.log(’微信内’)
// 获取queryStr
let queryStrArr = []
for (let key in this.queryData) {
const str = `${key}=${this.queryData[key]}` // name=tom
queryStrArr.push(str)
}
const queryStr = queryStrArr.join(’&’)
const jumpPath = `${this.path}?${queryStr}`
this.openWeappBtnHtml = `
<wx-open-launch-weapp
id="launch-btn"
username="${this.ghid}"
path="${jumpPath}"
style="background-color:transparent;"
>
<template>
<div style="width:800px;padding:100px;color:transparent;background-color:transparent;font-size:14px">跳转</div>
</template>
</wx-open-launch-weapp>
`
this.isInitWechatFinish = true
},
// 微信外
async initOutWeixin() {
const self = this
let res
try {
res = await window.tcb.callFunction({
name: self.callFunctionName, // 提供UrlScheme服务的云函数名称
data: {
path: self.path,
queryData: self.queryData,
},
})
} catch (e) {
console.log(’云函数失败了’, e)
}
console.log(’云函数结果’, res)
this.minihref = res?.result?.openlink ?? ’’
this.isInitWechatFinish = true
},
// 微信外跳转小程序 click
handleOutWeixinClick() {
if (!isWeixin() && this.minihref && this.isInitWechatFinish) {
window.location.href = this.minihref
}
},
}, // methods end
}
</script>
<style lang="less">
.p_1646876870010 {
position: relative;
overflow: hidden;
.open_app_div {
position: absolute;
top: 0;
bottom: 0;
left: 0;
right: 0;
}
}
</style>
复制代码
/**

 * @param {Array<string>} jsApiArr

 * @returns

 */

export function configWx(jsApiArr = [], openTagArr = []) {

  return new Promise(async (resolve, reject) => {

    if (!wx) return reject()
wx.ready(function (res) {
// config信息验证后会执行ready方法,所有接口调用都必须在config接口获得结果之后,config是一个客户端的异步操作,所以如果需要在页面加载时就调用相关接口,则须把相关接口放在ready函数中调用来确保正确执行。对于用户触发时才调用的接口,则可以直接调用,不需要放在ready函数中。
console.log(’wx ready 我打印的’, res)
return resolve()
})
wx.error(function (err) {
// config信息验证失败会执行error函数,如签名过期导致验证失败,具体错误信息可以打开config的debug模式查看,也可以在返回的res参数中查看,对于SPA可以在这里更新签名。
console.log(’wx error 我打印的’, err)
return reject(err)
})
// 请求
let config = null
try {
/**
* 苹果分享会是调取签名失败是因为:苹果在微信中浏览器机制和安卓不同,有IOS缓存问题,和IOS对单页面的优化问题,
* 通俗点说安卓进行页面跳转分享时会刷新当前的url,而苹果不会,苹果是通过历史记录进来的,不会刷新url所以会导致签名失败)。
*
* 所以
* 获取signUrl 安卓传全部的href,ios只用传#之前的
*/
let signUrl = ’’
if (isIOS()) {
signUrl = window.location.href.split(’#’)[0]
} else {
signUrl = window.location.href
}
const res = await request({
url: ’/h5/user/jsapi/initConfig’,
data: { url: signUrl },
})
config = res?.data ?? {}
} catch (error) {
return reject(error)
}
if (config) {
wx.config({
// debug: getIsProd() ? false : true, // 开启调试模式,调用的所有api的返回值会在客户端alert出来,若要查看传入的参数,可以在pc端打开,参数信息会通过log打出,仅在pc端时才会打印。
debug: false,
appId: appid + ’’,
timestamp: config.timestamp + ’’, // 必填,生成签名的时间戳
nonceStr: config.nonceStr + ’’, // 必填,生成签名的随机串
signature: config.signature + ’’, // 必填,签名
jsApiList: [’hideMenuItems’, ...jsApiArr], // 必填,需要使用的JS接口列表 // 这个貌似不能空
openTagList: [...openTagArr],
})
}
})
}
如果你觉得此文对你有一丁点帮助,点个赞。或者可以加入我的开发交流群:1025263163相互学习,我们会有专业的技术答疑解惑
如果你觉得这篇文章对你有点用的话,麻烦请给我们的开源项目点点star:http://github.crmeb.net/u/defu不胜感激 !
PHP学习手册:https://doc.
技术交流论坛:https://q.
以上就是关于微信h5游戏gg修改器_微信h5小游戏修改器的全部内容,游戏大佬们学会了吗?
不root用不了gg修改器么_gg修改器怎么不用root修改 分类:免root版 6,767人在玩 各位游戏大佬大家好,今天小编为大家分享关于不root用不了gg修改器么_gg修改器怎么不用root修改的内容,轻松修改游戏数据,赶快来一起来看看吧。 一、问题描述 邮件(Microsoft Outl……
下载
如何用gg修改器开root,软件下载:如何用gg修改器开root 分类:免root版 2,418人在玩 在手机玩家的眼中,root是一项至关重要的操作。它可以解锁手机的潜力,并允许用户以前无法做到的方式自定义其设备。虽然存在许多方法来获取root权限,但GG修改器是其中最简单和最流……
下载
怎样下载GG修改器免root版,下载GG修改器免root版轻松修改游戏数据 分类:免root版 5,441人在玩 GG修改器是一款经典的游戏修改工具,它可以帮助玩家快速修改游戏内的数据,例如获得更多的金币、钻石等。但是在使用之前,需要获取ROOT权限才能正常运行。不过现在有了免ROOT版的GG……
下载
gg修改器与root_GG修改器用 分类:免root版 6,378人在玩 各位游戏大佬大家好,今天小编为大家分享关于gg修改器与root_GG修改器用的内容,轻松修改游戏数据,赶快来一起来看看吧。 华为荣耀畅玩7X 是荣耀的一款千元全面屏手机,在双十一的……
下载
gg修改器免root是什么,下载gg修改器免root软件,畅享游戏乐趣 分类:免root版 1,692人在玩 gg修改器免root是一款方便用户修改游戏数据的工具软件,它可以在不需要进行root操作的情况下实现对各种游戏数据的修改。相比于其他类似软件,gg修改器免root更为稳定、易操作、功能……
下载
gg修改器免root咋安装应用,下载 GG修改器免root,让你的手机变得更加自由 分类:免root版 5,154人在玩 GG修改器是一款非常实用的手机应用程序,可以帮助用户在不需要进行Root操作的情况下修改游戏和应用程序。这意味着您可以在不影响设备性能或安全性的情况下增强您的移动体验。如果你……
下载
gg免root修改器怎么用,下载 gg免root修改器,轻松体验游戏乐趣 分类:免root版 3,261人在玩 如果你是一位热爱游戏的玩家,那么你必须知道 gg免root修改器。这款软件能够让你在不进行手机root操作的情况下,修改游戏内部数据。这意味着你可以轻松获得更多金币、钻石、经验和……
下载
gg修改器怎么root红米手机,下载一个神奇的软件,轻松root你的红米手机GG修改器 分类:免root版 5,231人在玩 随着智能手机功能的不断升级,越来越多的用户开始探索手机的更多玩法。而在对手机进行个性化设置和优化时,获取root权限是必不可少的一步。但是,对于大部分用户来说,root操作通常……
下载
怎么使gg修改器不用root 分类:免root版 6,858人在玩 各位游戏大佬大家好,今天小编为大家分享关于怎么使gg修改器不用root的内容,轻松修改游戏数据,赶快来一起来看看吧。 如何设置 GOROOT 环境变量?推荐读两篇英文文章,我意译了下……
下载
王者修改器gg下载root,下载王者修改器gg,让你的手机轻松ROOT 分类:免root版 2,762人在玩 如果你想要对你的手机进行一些改动,比如删除不需要的预装软件,或者安装一些需要ROOT权限的应用程序,那么你就需要ROOT你的手机。然而,这个过程更容易说得比做得。很多人会面临一……
下载